
The System Restore function in Windows is a useful tool for creating and preserving full system backups. If only Linux had a feature like this… oh wait, it does, and we have options to select from!
It almost sounds like magic to be able to restore your operating system to a prior state without any consequences.
Even if you don’t know what caused the problem, you can swiftly resume to work as if nothing had happened.
That’s why the System Restore feature is one of the most requested features from Linux by ex-Windows users.
Some even believe that because Linux lacks System Restore, it will never be as good as Windows.
Those people should study the manual or, better yet, this post, because we’ll show you the tools that bring System Restore to Linux today.
True, they aren’t always available by default, but neither is Windows 10’s System Restore.
You may claim that they don’t operate identically to their Windows counterparts, but the way System Restore works has changed between Windows versions.
How Does System Restore Work in Windows?
The initial System Restore feature introduced in Windows ME in 2000. (Millennium Edition). It was only capable of restoring system data and the registry, and it wasn’t very dependable. Later versions of Windows, such as Windows XP and Vista, brought improvements. Since then, System Restore has relied on a system function called Volume Snapshot Service, which can create automatic snapshots (“shadow copies”) of the system, including presently used files, and convert them into recoverable “restore points.”
While this new approach allowed for more customization, it also had drawbacks.
System Restore snapshots may only be used with NTFS partitions and aren’t permanent in versions of Windows prior to Windows 8.
Because “Home” editions of Vista lacked the interface for recovering earlier snapshots, and Windows 8 made it impossible to recover past versions of a file using Explorer’s Properties window, each subsequent Windows version added to the confusion. Finally, Windows 10 eliminated System Restore entirely, requiring users to manually enable it. This decision was most likely made to lead them to Refresh and Restore.
But enough about the operating system. Let’s see what we can do on Linux to make this work.
How Does System Restore Work on Linux?
It doesn’t, at least not in that form. In your distro’s menus, you won’t find a function labeled “System Restore.”
You’ll need to locate a method that works for you and install the essential software. The majority of them work on the same idea as Windows’ System Restore. They take snapshots of your system at predetermined intervals and allow you to go back in time
Let’s go through what system snapshots are before we get into the apps.
What’s the Difference Between System Snapshots and Backups?
Backups are copies of files held in a location separate from the files themselves. Semantics may vary, but in general, backups are copies of files preserved in a location separate from the files themselves.
When a backup includes everything on a disk, it’s referred to as a disk image or a disk clone.
This backup “mirrors” the entire disk, including user data, the operating system, boot sectors, and other information.
Disk images can be used in a bare metal restore, which involves copying the contents of a hard disk onto a computer that doesn’t have an operating system.
Snapshots, on the other hand, are filesystem states saved at precise points in time and stored on the same storage media as the filesystem.
They normally contain all of a filesystem’s directories and files, or at the very least, the files that the OS requires.
It is feasible to do a rollback by keeping the snapshot in the same location as the filesystem, but it also saves disk space. Each new snapshot in this arrangement does not need to save the complete filesystem state.
Snapshots, on the other hand, work like incremental backups, saving only the changes that have occurred since the last snapshot. This means that in order to properly restore the system, each snapshot relies on the prior one.
A full backup or a disk image, on the other hand, is independent of prior backups and can be used to restore the system on its own.
The issue with snapshots is that they’re vulnerable to disk failures; if your disk sustains serious mechanical damage, you’ll almost certainly lose the snapshots along with the entire filesystem.
To avoid this, take a snapshot immediately after installing and configuring your Linux distribution and save it to a different storage device.
There are a number of Linux tools that can assist you in maintaining system snapshots. The majority of them are user-friendly and don’t necessitate sophisticated Linux knowledge. Take a look at our list and choose the app that best suits your needs.
TimeShift
TimeShift has a simple graphical interface, and you can also use it from the terminal. By default, it doesn’t include a user’s personal files, but you can add custom directories to your snapshots. On Ubuntu and derivatives you can get TimeShift from the developer’s PPA:
sudo apt-add-repository ppa:teejee2008/ppa
sudo apt-get update
sudo apt-get install timeshift
while users of other distros can download the installer file and run it in the terminal:
./timeshift-latest-amd.64.runThere’s also a version for BTRFS filesystems that supports the native BTRFS snapshots feature.
How it Works
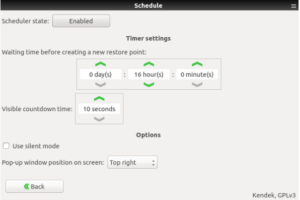
TimeShift lets you take snapshots whenever you want, or you can set it up to create them automatically. You can schedule hourly, daily, weekly, and monthly snapshots, and configure how often TimeShift should remove them. There is a special option called Boot Snapshots that creates one new snapshot after every reboot.
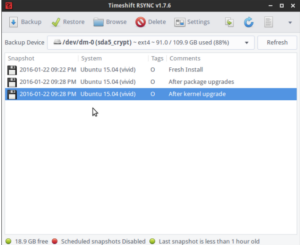
The procedure of restoring a snapshot with TimeShift is simple: you select a snapshot and specify the location to which it should be restored.
TimeShift lets you restore snapshots to external devices, and the Clone tool lets you replicate the current system state to another device directly.
This is useful for moving your operating system to a new machine without having to start from scratch.
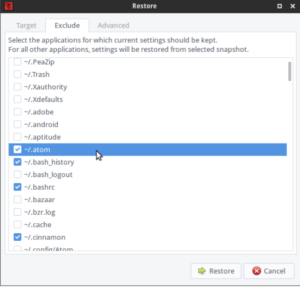
Before restoring a snapshot, TimeShift will ask if you want to preserve application settings, and let you choose which ones to keep. Remember that TimeShift requires GRUB 2 to boot into a restored snapshot.
Cronopete
If TimeShift is simple, Cronopete is even simpler, at least in terms of appearance. It calls itself a clone of Time Machine for OS X, and works a bit differently than TimeShift. Cronopete offers packages for Ubuntu, Debian, and Fedora, while Arch Linux users can find it in the AUR.
How it Works
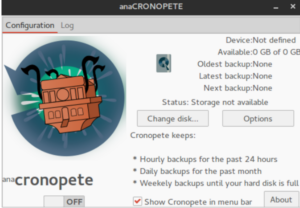
Cronopete combines the backup and snapshot concepts and forces you to keep snapshots on an external device, unlike the other programs on this list. It checks for changes in your files every hour by default, but you can modify the interval in the setup dialog. Cronopete will only hard-link to a file that hasn’t changed, rather than copying it, to preserve disk space.
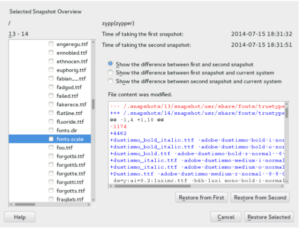
Cronopete’s best feature is arguably its ability to restore files. It allows you to visually browse all stored versions of your files and folders by “scrolling through time.” Simply select the files you want to restore and click Restore. They will be copied onto your present system from the external disk. Cronopete isn’t very practical for a full system restore, as you might expect, but it’s a wonderful solution if you want to retain several copies of individual files.
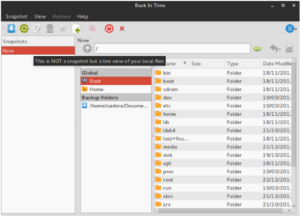
Back In Time
Back In Time looks user-friendly enough to attract Linux beginners, while its Settings dialog offers fine-grained control. The interface acts like a regular file manager, and you can preview all your snapshots, browse files in each of them, and restore selected files and folders.
Back In Time can install from a PPA if you’re on Ubuntu:
sudo add-apt-repository ppa:bit-team/stable
sudo apt-get update
sudo apt-get install backintime-qt4
Several distributions offer it in their repositories, and if yours doesn’t have it, you can always download the source.
How it Works
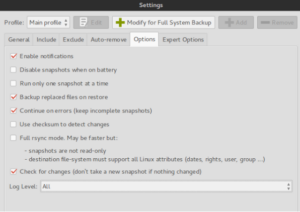
Back In Time produces snapshots of your chosen directories, but it can only restore those to which you have write permission.
Your snapshots can be encrypted and saved to a network device, an external hard drive, or your local filesystem.
Back In Time only updates altered files, and the Settings > Options tab allows you to turn off snapshots when no changes are required.
Systemback
Systemback packs an impressive amount of features in a tiny interface. Unfortunately, only users of Debian, Ubuntu, and its derivatives can play with Systemback for now, because there are no installation files for other distributions. The developer provides a PPA:
sudo add-apt-repository ppa:nemh/systemback
sudo apt-get update
sudo apt-get install systemback
How it Works
Systemback isn’t just another tool for taking snapshots. It can convert your current operating system into a bootable live CD or DVD that you can use on another computer. It can repair the fstab file and fix or reload the GRUB 2 bootloader. Even so, you’ll most likely use it for system snapshots.
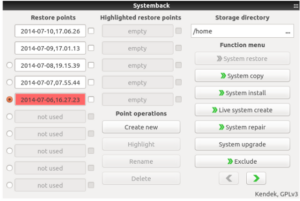
Systemback restricts the total number of snapshots to 10 and leaves the removal to you. Snapshots can be incremental (only altered files are copied; the rest are hard links), however this can disable in the Settings dialog.
You have the option of doing a complete restoration or merely copying the relevant system files when recovering files. Your personal data, like as photos and documents, will not be included in the snapshots, but you can use the Live system build > Include user data option to transfer them to a live CD.
You can change the snapshot schedule in Systemback, but you may also disable it and make restore points manually.
You should keep in mind that Systemback does not support the NTFS filesystem, thus you won’t be able to restore a snapshot to or from an NTFS partition.
Snapper
Snapper is closely tied to openSUSE, where it was introduced in version 12.1. It’s possible to install it on other distributions, but it’s not guaranteed to work. The easiest way to set up Snapper is to install openSUSE on a BTRFS partition; in that case, Snapper gets automatically installed and configured. You can use Snapper as a command-line tool or through YaST, and there’s an alternative called snapper-GUI.
How it Works.
Snapper creates a variety of distinct snapshots. Before and after installing new packages using zypper or YaST, as well as when modifying the system with YaST modules, pre and post snapshots are taken. You may then compare snapshots and roll back to a previous state if the modifications cause problems. Unless you disable them, timeline snapshots are made automatically every hour. All other snapshots, even those created manually, are referred to as single. Snapshots are made on the same partition as the original, and they expand in size with time, so keep that in mind when you organize your disk space.
By default, Snapper creates snapshots only for the root partition. To include other partitions and BTRFS subvolumes, you have to create a configuration file for each of them. Make sure to run the command as root:
snapper -c CONFIGNAME create-config /PATHHere -c stands for “configure”, CONFIGNAME is the name you choose for the configuration, and /PATH is the location of the partition or subvolume. For example:
snapper -c home create-config /homeYou can check currently active configurations with:
snapper list-configsAll configuration files saved in
/etc/snapper/configs, and you can modify them in a regular text editor. For example, you can disable hourly snapshots, toggle automatic snapshot removal, and tell Snapper how many old snapshots to keep.
You may create and compare snapshots with the YaST Snapper module. You can also recover a previous version of a single file or a group of files by rolling back to a previous snapshot.
An additional rollback method is provided by the package
grub2-snapper-pluginfor openSUSE. This lets Snapper boot into a snapshot and restore the system directly from the bootloader menu. On other distributions you can try grub-btrfs to get similar results. Note that you can only boot snapshots created for the root partition.