A program’s installer might go wrong for a variety of reasons, resulting in an error. On Windows 11, here’s how to fix an NSIS problem.
When trying to run a setup file, you may discover that it has become corrupted in some way.
For example, you could have downloaded an incomplete package or the download was never completed completely.
When you execute a faulty installation, Windows responds with an NSIS error.
If you encounter this error, use the following troubleshooting procedures to resolve the NSIS error on Windows 11.
What Causes the NSIS Error Launching Installer?
This mistake might have a variety of causes.
As previously stated, file corruption and incomplete downloads are the most prevalent reasons of this issue.
However, there are other possible causes for this issue, such as special characters in the installer name or an erroneous directory path due to special characters.
Another reason you can get this error is if you have a clash with a third-party program. You can use the Task Manager to look for processes and terminate those that are interfering with the task.
We’ve listed a list of known fixes for the NSIS error in Windows 11 down below.
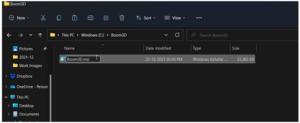
1. Move the Setup File to a Different Directory
Moving the installer to a new folder will help you avoid the NSIS issue while running the setup file. Open File Explorer and navigate to the setup file you wish to run.
To copy a file to your clipboard, select it and hit Ctrl + C. Next, if another disk is available, create a new folder and paste the copied file using the Ctrl + V shortcut. Keep the name of a new folder basic and avoid using any unusual or non-English characters.
If the problem persists, try running the installer from a different hard drive. Use a USB flash drive if you’re dealing with a single drive. Place the setup file on your USB flash drive and execute it from there. This is more of a workaround, but it should work if you’re having trouble with a particular installer.
2. Rename the Setup File
Another easy way to fix the NSIS installer error is to rename the installer. Renaming any file on Windows 11 is easy. Here’s how to do it.
- Locate the installer you want to rename using File Explorer.
- Select the installer file and press F2. Enter a new name for your file. Try to keep the name to one word and without a hyphen or other special characters.
- Click away to save the changes.
Run the installer and check if the error is resolved. If the issue persists, run the installer in Compatibility Mode to see if that helps.
3. Run the Program in Compatibility Mode
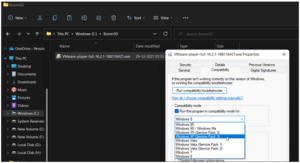
You can make an app or installer run in compatibility mode if you want it to.
The app uses the settings for an older version of the Windows OS in this mode, which is useful if the app was built to work with older Windows versions.
To run the installer in compatibility mode:
- Locate the installer you want to install.
- Right-click on the installer file and select Properties.
- In the Properties window, open the Compatibility tab.
- Check Run this program in compatibility mode for option. Then click the drop-down and select the Windows version older than your current version (Windows 8, 7, XP, so on).
- Click Apply and OK to save the changes.
- Run the installer again and check if the setup completes without the error.
4. Find the Conflicting Program Causing the NSIS Error
Third-party software on your computer may cause a conflict with the new apps, resulting in an error. The Task Manager can be used to trace down and troubleshoot the program that is causing the problem.
Follow these steps to locate the program causing the error:
- Run the installer and wait for the NSIS error to occur. Do not close the error window.
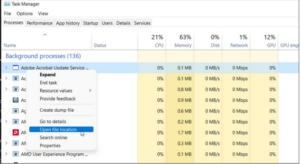
- Next, press Ctrl + Shift + Esc open the Task Manager.
- In the Process tab, locate the NSIS error.
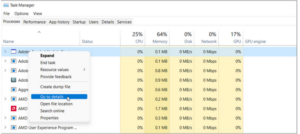
4.Then pick Go to details from the right-click menu on the problem process.
The application name that is causing the NSIS problem should be visible in the details tab.
5.If it doesn’t work, right-click the error process again and choose Open File Location from the menu.
This will open the process location and assist you in determining the error’s cause.
6.You can then move to uninstall or reinstall the problematic app to fix the error.
To uninstall the troublesome app:
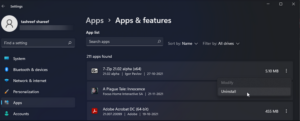
- Press Win + I to open the Settings app.
- Open the Apps tab and then click on Apps & features.
- Scroll through or use the search bar to locate the app.
- Click the three-dots menu beside the app name and select Uninstall.
- Click on Uninstall once more to confirm the action.
- Restart your PC and check if the error is resolved. You can then go ahead reinstall the app.
5. Install the Program Using Command Prompt
Using Command Prompt, you may force programs to install on your computer.
To use Command Prompt to execute the installation, follow these steps:
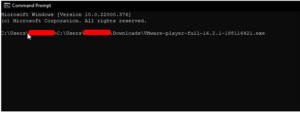
- Press the Windows key, type cmd, and click on Command Prompt.
- Next, open the File Explorer and locate the installer file.
- Drag and drop the file onto the Command Prompt window to add the file path.
- Hit Enter to execute the file and run the installer.
The file path will not appear after a drag and drop if you start the Command Prompt as administrator.
In that instance, manually type the installer file location and press Enter to start the installation.
To install the app, run the setup wizard and follow the on-screen instructions.
6. Download the Installer From a Different Source
It will not install correctly if you have downloaded an incomplete or damaged installer. Reinstall the software or search for the setup file on a reputable third-party website.
It should be noted that downloading malware-infected software from third-party sources carries a risk.
To scan for malware and secure your PC, use caution and run executables from unknown sources through internet virus scanners.
On Windows machines, installer mistakes are quite common.
The NSIS error, on the other hand, is frequently caused by problems with the file name, path, or the setup file itself.
Look for any third-party apps that might be interfering with the installation.
Click here to read more useful and interesting articles.